


Add Condition: where a user can define conditional pricing rules

- Label:
- A text field where the user can specify a name for the condition. This label identifies the condition in lists or reports.
- A text field where the user can specify a name for the condition. This label identifies the condition in lists or reports.
- Color
- This allows the user to assign a color code to the condition for easier identification or categorization. The colored circle visually represents the chosen color.
- This allows the user to assign a color code to the condition for easier identification or categorization. The colored circle visually represents the chosen color.
- Type
- A dropdown where the user selects the type of conditional price adjustment. In this case, it is set to “Discount”, indicating that this condition will apply a discount to the price. It can be either ( Discount or Addition )
- A dropdown where the user selects the type of conditional price adjustment. In this case, it is set to “Discount”, indicating that this condition will apply a discount to the price. It can be either ( Discount or Addition )
- Amount
- The amount of the discount or addition is specified here.
- The amount of the discount or addition is specified here.
- Amount Type
- Another dropdown that allows the user to specify how the amount is applied, either as a percentage or a fixed value.
- Another dropdown that allows the user to specify how the amount is applied, either as a percentage or a fixed value.
- Price Source
- This field defines where the discount will be applied. The selected value is “Appointment sum price”, which suggests that the discount will be applied to the total price of an appointment or service price only.
- This field defines where the discount will be applied. The selected value is “Appointment sum price”, which suggests that the discount will be applied to the total price of an appointment or service price only.
- Start Date/End Date
- A calendar input allows the user to define when the conditional price rule starts being applicable. The start date shown is 2024-09-01.
- Another calendar input defines when the conditional price rule expires. The end date in the image is 2024-09-30, meaning the discount will only apply between these two dates.
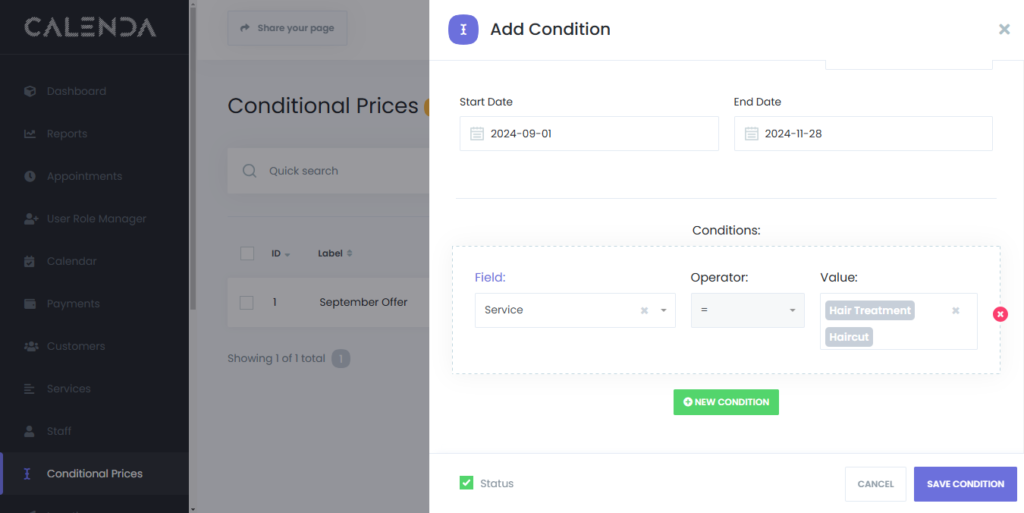
- Conditions
- This section allows the user to set specific conditions under which the discount or pricing adjustment will be applied. The elements are:
- This interface allows users to define rules based on fields, operators, and values. The conditions can be combined using logical operators (like AND or OR) to create complex filters. Here’s a breakdown of the elements:
- Field: The field being filtered is selected from a dropdown menu. In this case, the field is set to Service, meaning the rule applies to the available services.
- Operator: This dropdown defines the type of comparison between the field and the value. The operator is set to = (equals), meaning that the selected service must match the value(s) specified.
- Value: The specific values that correspond to the selected field are shown here. In the example:
- The first condition has Hair Treatment as the value, meaning the rule applies if this service is selected.
- The second condition has Haircut as the value, meaning the rule applies if this service is selected.
- Logical Operators: Between the conditions, an AND operator is selected. This means both conditions must be met for the rule to apply. There is an option to change this to OR to allow either condition to be satisfied.
- New Condition Button: The green New Condition button at the bottom allows the user to add additional conditions, further refining the rule.
- This section allows the user to set specific conditions under which the discount or pricing adjustment will be applied. The elements are:
- Status
- At the bottom left, there is a toggle for the status of the condition. It is set to active (green check mark), meaning the condition is enabled.
- At the bottom left, there is a toggle for the status of the condition. It is set to active (green check mark), meaning the condition is enabled.
- Action Buttons
- Cancel: This button cancels the creation or editing of the condition without saving.
- Save Condition: This button saves the defined condition and applies it to the system.